How to Git as a REAL beginner
If you search YouTube or other websites for beginner tutorials, you'll quickly find that there’s a lot of information to learn. The problem is when you're just starting out, you probably won’t use most of the commands they teach. Here, I’ll focus on what a genuine beginner actually needs to know....
What is Git?
If you search YouTube or other websites for beginner tutorials, you'll quickly find that there’s a lot of information to learn. The problem is when you're just starting out, you probably won’t use most of the commands they teach. Here, I’ll focus on what a genuine beginner actually needs to know....
Lets start with the most important questions, what is git and why is it so important?
Git is simple terms is tool to keep track of changes in computer files over time. But what does that actually mean? It's easier to understand with an example. Let's say you and John are working together on a project. Here's how the project currently looks like
Project 1
-- main.py
-- cli.py
-- test.py
You don't need to understand what each file does yet. All you need to know is that inside the Project 1 folder, there are three different Python files.
Suppose you and John share the project through Telegram. Every time one of you makes an update, you send the entire project folder to the other person. At first, it seems practical. But after a while, your chat starts looking like this:
You  : Project 1
You  : Project 1(1)
John : Project 1(2)
You  : Project 1(final)
You  : Project 1(final 2)
John : Project 1(real latest)
You  : Project 1(actual final latest)
You can probably already see the problem.
Instead, since you are smart, you decide to use Google Drive. Now you can update just main.py without sending the entire project again. Now its much better since you can really just replace a single file like main.py without changing other files at all. That's great right? Well kinda if its just you and John.
Now imagine the project becomes extremely successful and suddenly 100 developers are working on it. Now at least 10 people is working on same main.py, how would you make them work on that file? it would need them to work on same file one at a time right? If everyone has to wait for the previous person to finish before touching the file, development becomes really slow but you can still get job done regardless yeah? Nope, it gets even more complicated. Imagine your feature requires changes to all the files available:
Project 1
-- main.py
-- cli.py
-- test.py
You might have to coordinate with several other developers before you can safely make your changes. With hundreds of developers, this quickly becomes impossible to manage manually.
That is where git comes in, Git allows developers to work on the same project simultaneously without everyone having to directly modify the same files at the same time. One of the most important features Git provides is version control. It allow branching and revert to different versions of files without breaking anything (most of the time). Now, you, John and 100 of developers can work together, error free and faster. You don't really need to know how the underlying on how git works yet but as we go through a few practical examples and commands, you'll gradually see why Git exists and why developers rely on it.
Getting Started
Ok, now that you understand Git, let's get to the fun part, setting it up. If you already have Git and a GitHub account set up beforehand, you can skip this section and move on to the Git Commands session or follow along anyway to make sure everything is working correctly.
Create a GitHub Account
Before learning about git, it would be better if we have set up GitHub account. Go to https://github.com/ and create a free account. Remember your account name, it will be useful later (e.g. yassershahofficial). On the GitHub account, create a new repository and named it example-project.
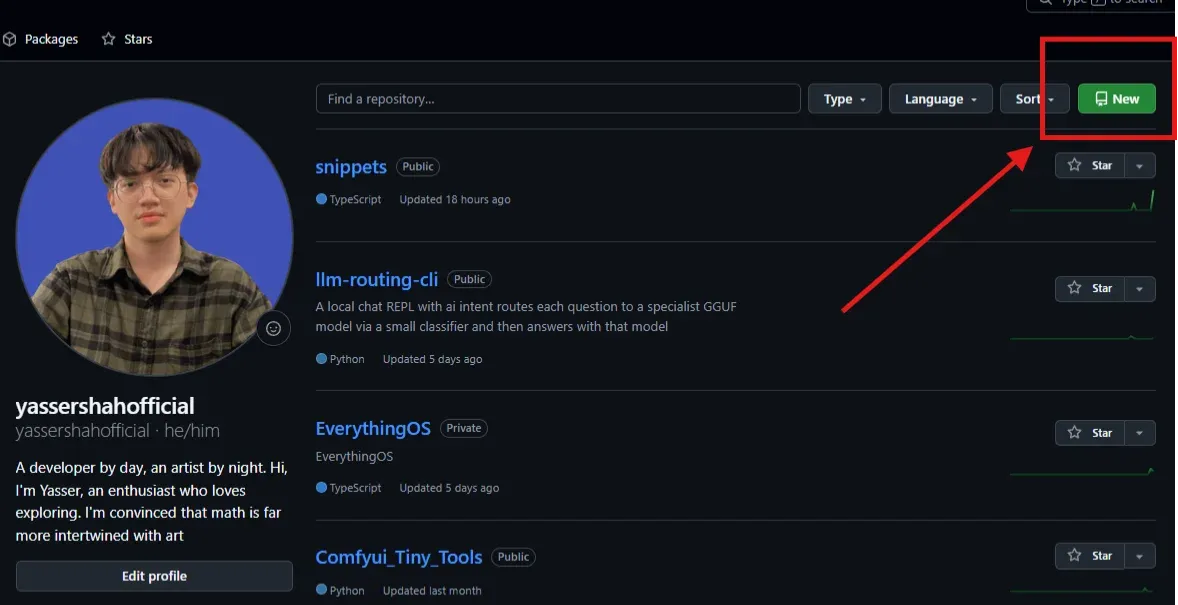
You will use this account to store your Git repositories online and collaborate with other developers. Just a note, Git and GitHub are different but you need both. Git is the tool that tracks changes to your code. GitHub is an online platform where you can store and share your Git repositories.
Install Git
Now let's install Git on your computer. On Linux and macOS, open your terminal.
Linux (Ubuntu/Debian)
Install Git using the default package manager.
sudo apt update
sudo apt install git
MacOS
If you have Homebrew installed, install Git using.
brew install gitWindows
Install Git using the official installer.
Go to Git-Official-Website
Download the latest version of Git for Windows
Run the .exe file
Accept the default settings throughout the installation
Check Your Git Installation
After setting up Git, to check whether your installation is successful. Open your terminal and run:
git --versionYou should see something similar to git version 2.50.1. Your version might not be exactly the same as mine and that's completely okay. Git releases new versions over time and for what we're doing in this tutorial, the version difference wouldn't affect anything.
Git Commands
For the git command before we write anything, try understand its use case first. Every command you run may give different result so its better to read before running. On Linux and macOS, open your terminal. On Windows, open PowerShell or Command Prompt.
1. git init
Git init is use to initialize the current folder to have .git folder so you can actually start using all the other git commands available. .git folder is actually a hidden folder so you can't really see it. To be able to see it, try running ls -a instead of ls . It may looks like this on directory tree:
Project 1
-- main.py
-- cli.py
-- test.py
-- .git/        <--- this is the hidden file
                     created by git init
Inside the .git folder is where all the information needed for git to handle your project like commit history, branches, configuration and references versions. You don't need to make any changes inside that folder, as long as you use their available commands (run git --help to know all the commands available).
How to run it:
mkdir project1 # Create project folder named project 1
cd project1    # Make sure to enter the project folder
pwd            # To check where are you on the path
git init       # Initialize git into the project
ls -a          # Check all the folder and files available
               # Make sure .git folder is created
There you go the first step for any git project. Simple yeah.
2. git clone
Git clone is opposite of creation, its to copy other people git project to our computer. Imagine this, when someone create a project using git init and push into their GitHub, if you want to download their project, you'll need to use git clone for that.
How to run it:
git clone https://github.com/yassershahofficial/universal-hello-world.git
# Run a universal GitHub repo as an example
cd universal-hello-world
bash run_all.sh
If you successfully run this, you'll see one or couple of hello world printed on your terminal/PowerShell.
3. git status
Git status is a current state checker for the project. It tells you what is happening with your Git repository, such as whether you have modified files, untracked files, changes ready to be committed, local branch (your computer) is ahead of or behind its remote branch (GitHub Repository). When you make changes to your project, Git can detect those changes by comparing your current files with the state Git already knows about. Running git status lets you see those changes. Some examples:
When there are files on your computer that Git is not tracking:
yasser@LAPTOP-XXXXXXX:~/projects/active/EverythingOS$ git status
On branch main
Your branch is up to date with 'origin/main'.

Untracked files:
  (use "git add <file>..." to include in what will be committed)
        .playwright-cli/
        .playwright-mcp/

nothing added to commit but untracked files present (use "git add" to track)
Here, .playwright-cli/ and .playwright-mcp/ exist on your computer but Git is not tracking them yet.
When there are no changes:
yasser@LAPTOP-XXXXXXX:~/projects/active/universal-hello-world$ git status
On branch main
Your branch is up to date with 'origin/main'.

nothing to commit, working tree clean
Here, Git has no changes to report. Your working directory is clean and your local main branch is up to date with the remote-tracking origin/main. You don't need to understand branching yet but just know its just different versioning of the same project.
I believe this is one of the most useful commands because you'll run it constantly during development. For example, you might modify several files and then forget what you changed. Instead of manually checking every file, just run git status , it immediately gives you an overview of your current Git state.
When working with other developers, you may also want to check your repository regularly because other developers can push changes to the remote repository while you're working locally. However, keep in mind that git status itself does not download those new changes. Commands such as git fetch or git pull are used when you need to update your local knowledge or working files from the remote repository, on later section will explain more on these commands.
4. git add
Git add is to add changes into the next commit. This part is slightly confusing so i will explain it more descriptively. Let's say you git clone your own project (download the project from GitHub to your computer), then you add a new file into that project locally (computer), in order to update changes from local to the remote repository (GitHub), you need to add, commit and push the project.
How to run it:
git clone <Github Repository URL> # Your own GitHub project
touch test.py                     # Create an empty python file
git status                        # See whether test.py is untrack
git add test.py                   # Add the test.py to staging area
git commit -m "add new file"      # Commit the changes
git push                          # Push the changes to GitHub Repo
Ok there's a lot of new commands here but let just focus on git add first. When we create a new files, modified any current files or delete any current files of the project, Git can detects it. In order to update the changes remotely so everyone can see the new changes to the project, we need to add the files using git add <file_name> in this case the project have new file name test.py so git add test.py . What this does is, Git add the file from local to staging area where all the changes that want to be update from local to remote. Here is the catch, it doesn't update the changes on remote yet, it only keep locally on staging area first. Later when we git commit and git push , only then the new changes reflected upon the remote (in the GitHub Repository).
Why have git add and not just git commit and git push you might ask? Its because developer usually have lots of changes in the project but not all project should be updated to the remote yet so git add is use to make targeted changes instead of detecting all changes in the project. Remember this, git add does not update GitHub. It only prepares changes locally for the next commit.
5. git commit
Git commit is project key point every time we commit and push. If you haven't read about git add yet, I recommend reading that first because git commit builds directly on top of the staging area.
Every files and folders you git add will be included into a list of next git commit version to be updated. Let's make an example here:
touch test.py test2.py test3.py    # Create 3 empty files
git add test.py                    # Add test.py to staging area
git add test2.py test3.py          # Add 2 files to staging area
git commit -m "add 3 tests"        # List 3 files as a new saved point
git push                           # Update the 3 files as new changes
We made 3 new files and those files are added to the staging area using git add <files_name>. Now, Git takes everything currently in the staging area and records those changes as a new commit in the project's history using git commit -m "<name_of_this_changes>" and we ready to update the changes on GitHub, we git push .
Let's try and see on the different landscape here. We have multiple features we want to add to the project, says:
feature 1: create a form (files that are modified: form.py, route.py)
feature 2: fix a small bug (files that are modified: buttons.py)
So what do you think the sequences of commands will be?
#assuming form.py, route.py and buttons.py are already modified

git add form.py route.py
git commit -m "feature 1: create a form"

git add buttons.py
git commit -m "feature 2: fix a small bug"

git push            # Push both commits to the GitHub
Notice that one git push sent both commits to GitHub. This is why the staging area and commits are useful together. You can separate your work into logical checkpoints instead of having one huge commit containing unrelated changes. Cool right? Developers now can see all the changes and what are being changed on each version of the project very detailed.
Real life example:
yasser@LAPTOP-XXXXXXX:~/projects/active/universal-hello-world$ git log
commit cff31afc8a575bb6429146f02bc671ff6bef40f4 (HEAD -> main, origin/main)
Author: yassershahofficial
Date:   Mon Sep 28 16:03:17 2026 +0800

    refactor: memory size

commit 1be3ee0ba34a3922c9359c2ff5fbe277995d69d6
Author: yassershahofficial
Date:   Mon Sep 28 15:48:56 2026 +0800

    refactor: explained precisely

commit 02bc238a4107879a5d558a4fbb03e10f1aaf15e5
Author: yassershahofficial
Date:   Mon Sep 28 15:43:36 2026 +0800

    features: hello world in 47 languages with run_all script, Codespaces setup
try using git log to see all the changes that have successfully push to GitHub Repository.
6. git push
Git push is sending all commits from local to remote (GitHub). At this point, you already saw git push use multiple times across many examples. Its usually the end of the command when we're ready to update the changes for other developer to see or just stored in remote so we can delete the project locally.
I never keep my project locally these days. Since I can just store them in GitHub as "Google Drive" for all my codebase. I saved lots of storage from this, having 50+ projects in my computer is not reliable and I may lost them one day due to computer corruption or just computer getting old. Just remember to turn important projects private if you are not planning to share the project for public references.
7. git pull
Git pull is opposite of sending, its receiving commits from remote to local. When someone make changes in the GitHub, you might want to update those changes to your own computer, in order for you to get the latest updates.
How to run it:
git clone https://github.com/yassershahofficial/universal-hello-world.git
# Download the project locally

git status    # Check for any updates
git pull      # Pull the new update from the remote into local

git status    # Your project is up to date
If you are working solo, you barely use this. However, you will still need this when you rely on other people projects to keep up to date or go through different version of the commits.
Putting Everything Together
Since you've read, tried and understood all the commands, let's add them into daily workflow that you'll actually use.
1. Solo Project
When building a solo project, you may go constantly just add new features and push to the remote without relying on pulling any new updates. This are typical workflow of it:
git init                 # Initialize first time only

touch main.py            # Create and edit the file
vim main.py

git add main.py          # Add the file to staging
git branch -M main       # Create branch first time only
git commit -m "first commit" # Commit the staging
git push -u origin main  # Update changes to remote
                         # use -u first time only

vim main.py              # Create and edit any files
touch cli.py
vim cli.py

git add main.py cli.py   # Add the files to staging
git commit -m "add cli mode"
git push                 # Update changes to remote
You can see all the commands we've learn are applicable here. Just some new commands you may never seen like git branch -M main and git push -u origin main . You will need both of that for the first time pushing the code from local to remote. You can try understand those with AI but to be honest, you will do that every time you create the project first time so it kinda stick in your head, the more you do it.
2. Use Others' Projects
There will be times when you want to use someone else's project, library, tool, or system from GitHub. For example, when I use ComfyUI for Image Generation, I pulled lots of custom nodes from other developer to add as extension to my project. This are typical workflow of it:
git clone https://github.com/yassershahofficial/universal-hello-world.git
# Download the project locally

# Check their documentation on how to run the code
# Refer to the README.md

cd universal-hello-world
bash run_all.sh
3. Work With Others
You probably won't need this workflow when you're just starting to learn Git. However, we should still at least be aware how to do it so when times come, there will less friction to start development process. This are typical workflow of it:
git clone https://github.com/yassershahofficial/universal-hello-world.git

# Ask them to add your GitHub account for access to write and update to their project. Add as Co-author or contributor

git fetch                 # Check remote version
git status                # Check current state
git pull                  # If not up to date

vim adapter.py            # Create/Modify any file(s)

git fetch                 # Check remote version
git status                # Check current state
git pull                  # If not up to date

git add adapter.py        # Typical update steps
git commit -m "adapter"
git push
When working with other developers, you need to be more aware of changes happening on the remote repository. Use git fetch to make sure you always have the latest update, but not forcing you to be up to date. Then check with git status and if any changes happening, you could git pull before pushing your latest code. Note that any changes you pull will still have your code intake so don't worry too much about having all your work lost. In rare case, you both are developing on the same function or file, that could cause merge conflict. That's for another day problem.
4. Deleting Project and Continue Develop
You don't necessarily need to keep every project on your computer forever. Suppose you finish a project and want to remove it from your computer to free up storage and maybe one day come to the project back. This are typical workflow of it:
git add .
git commit -m "done"
git push                  # Last update before deleting it
cd ../
rm -r hello-world/        # Delete the project locally

# Project is removed, presume you came back
# after x days of non development

git clone https://github.com/yassershahofficial/universal-hello-world.git

vim adapter.py            # Create/Modify any file(s)

git add adapter.py        # Typical update steps
git commit -m "adapter"
git push
The project is now gone from your computer, but the remote repository still exists on GitHub. With this workflow, you may delete or continue development at any time and at any computer. Why would someone do this? most common cases are developer don't need to keep their project locally at all times, they can pull them at any time and continue development, this save quite a chunk of storage as bigger project require bigger storage. another case is because developer works same project on different workstation, today laptop A is yours, tomorrow its other developer possession, you pretty much avoid people getting through your confidential project on development. Just remember that git push is what matters before deleting your local copy. If you have uncommitted or unpushed work, deleting the folder can mean losing that work.
The World is Yours
Congratulations, you have completed the beginner guide on how to git. Now the world is yours, you could apply this to your daily development and learn how developer can be effective at their work or hobby.
When I first started using Git, I was developing alone. I rarely worked with other people on the same codebase so this set of commands was enough for most of what I needed. At that stage, you also didn't need to worry much about branches, merging, rebasing or other Git concepts yet.
And that's the point of this guide.
You don't need to learn all of Git before you start using Git.